Data Plane on On-Premises Servers
Deploy the Aurva Data Plane on provisioned on-premises servers.
Overview
The Aurva Data Plane collects discovery, classification, query activity, and posture telemetry from your environment and forwards it to the Aurva Control Plane for analysis and visualization.
This guide covers Data Plane deployment on already-provisioned servers (on-premises or in any cloud) using Aurva's standalone Docker Compose installer.
High Level Architecture
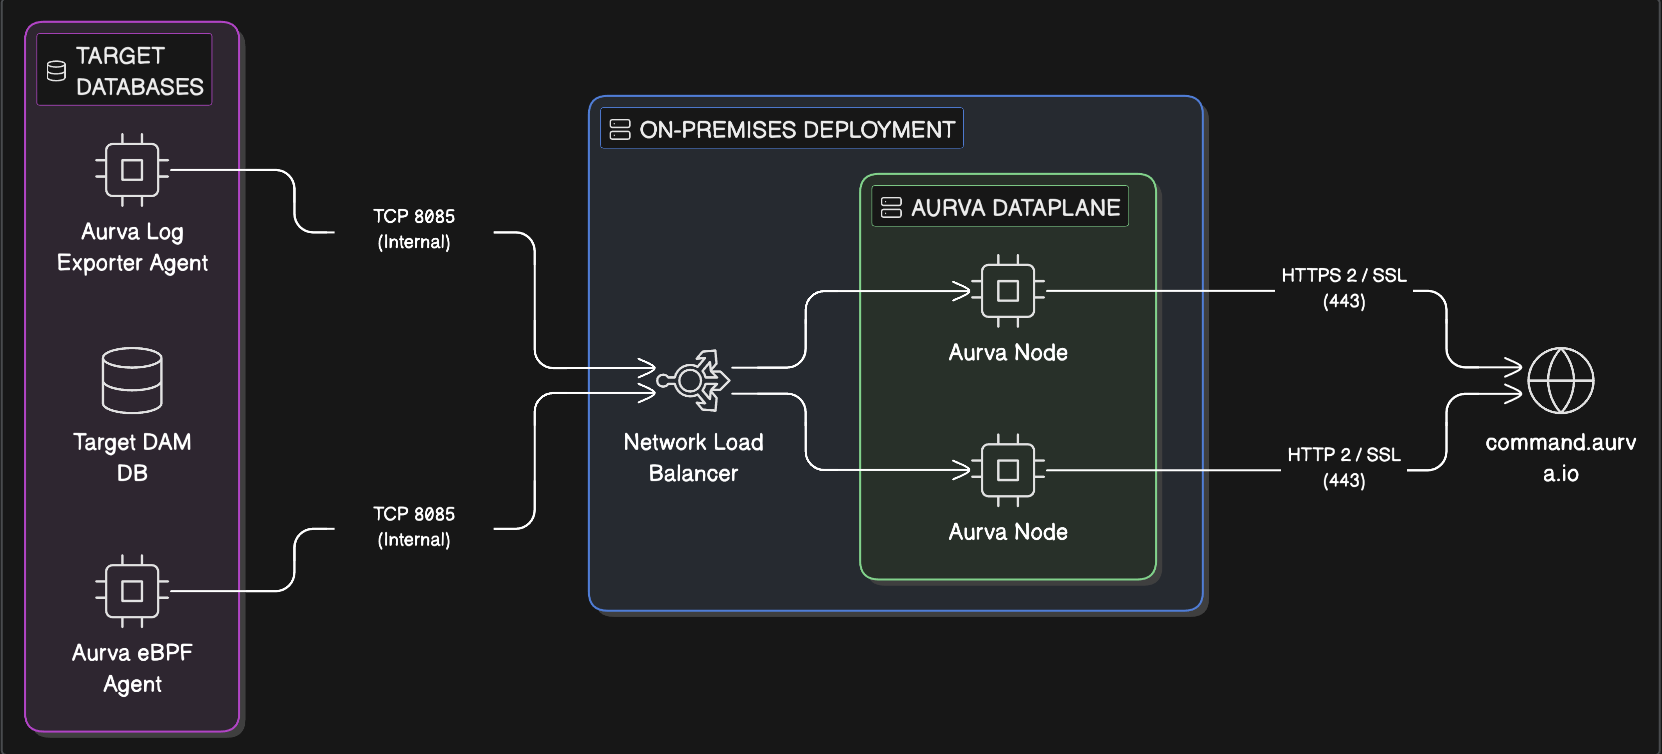
Aurva deploys a Data Plane consisting of multiple nodes (two in the diagram) for high availability. When DAM is enabled, an Aurva agent is also installed on each monitored database; the agent forwards database activity to the Data Plane through a network load balancer (nginx). The Data Plane processes these events and forwards the structured results to the Control Plane.
Infrastructure Prerequisites
The customer must provision the following before installing the Data Plane:
| Component | Requirement |
|---|---|
| Architecture | x86_64 |
| Supported OS | Ubuntu 20/22/24/25, RHEL & AlmaLinux 8/9/10 |
| Compute | 4 vCPU, 16 GB RAM (minimum) |
| Storage | 50 GB minimum |
| Node count | Production: minimum 2; scale out as needed. PoC: 1 is acceptable. |
Networking Prerequisites
The following outbound destinations must be reachable from the Data Plane servers:
| Destination | Port | Purpose |
|---|---|---|
Control Plane URL (command.aurva.io for production, command.uat.aurva.io for PoC; PaaS uses your internal subdomain) | 443 | Data Plane → Control Plane communication |
resources.deployment.aurva.io | 443 | Download deployment scripts and resources |
registry.aurva.io | 443 | Pull Aurva container images |
| Target databases | Native database ports | Required for discovery, classification, and DAM |
Deployment Steps
Step 1 / 6 — Become root
sudo su
Step 2 / 6 — Download the installer
Using curl:
mkdir -p /opt/aurva-dataplane
cd /opt/aurva-dataplane
curl -O https://resources.deployment.aurva.io/manifests/main/install-standalone-dataplane-dockercompose.tar.gz
tar -xzvf install-standalone-dataplane-dockercompose.tar.gz
rm install-standalone-dataplane-dockercompose.tar.gz
Using wget:
mkdir -p /opt/aurva-dataplane
cd /opt/aurva-dataplane
wget https://resources.deployment.aurva.io/manifests/main/install-standalone-dataplane-dockercompose.tar.gz
tar -xzvf install-standalone-dataplane-dockercompose.tar.gz
rm install-standalone-dataplane-dockercompose.tar.gz
Step 3 / 6 — Navigate to the installer directory
cd /opt/aurva-dataplane/install-standalone-dataplane-dockercompose
Step 4 / 6 — Configure environment variables
Open the global variables file and update the values:
vi variables/global_env
If you are deploying to a cloud provider (AWS, GCP, or Azure), also update the controller-specific variables:
vi variables/controller_env
Set:
HOSTING=cloud
REGION=<CLOUD_REGION>          # e.g. ap-south-1
CLOUD_PROVIDER=<CLOUD_PROVIDER> # aws | gcp | azure
Step 5 / 6 — Make the installer executable
chmod +x main.sh
Step 6 / 6 — Run the installer
bash main.sh --postgresql=enable --controller=enable --piianalyser=enable
Installation typically completes in 2–3 minutes.
Verification
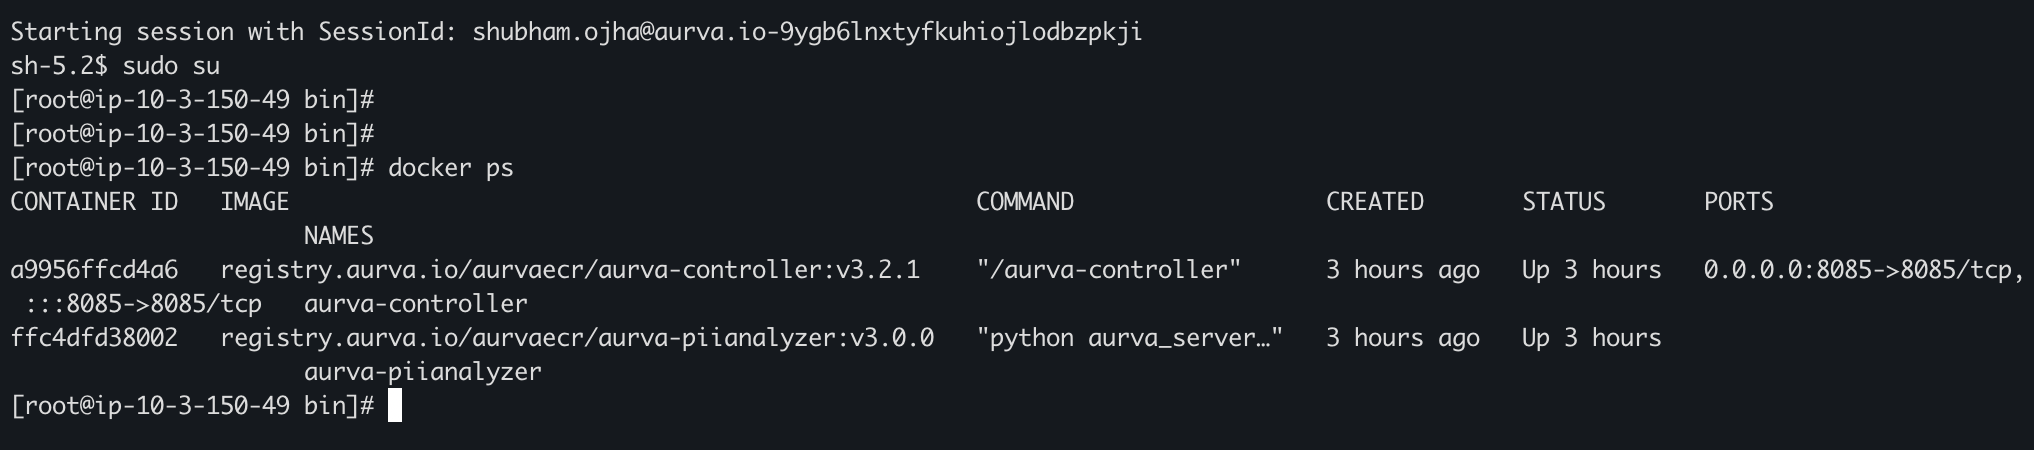
1. Confirm containers are running
docker ps
You should see aurva-controller, aurva-piianalyser, and aurva-postgresql in the list. To inspect logs for any service:
docker logs <CONTAINER_ID>
2. Confirm in the Aurva console
In the Aurva console, navigate to Settings → Monitoring Configuration. The new Data Plane (named per UNIQUENESS_IDENTIFIER in global_env) should appear and report Healthy within a few minutes.

Next Steps
- Onboard your first asset via Onboarding a Data Asset Manually.
- Enable DAM via Monitoring Configuration.