Data Plane on GCP GKE
Deploy the Aurva Data Plane on Google Kubernetes Engine.
Overview
The Aurva Data Plane collects discovery, classification, query activity, and posture telemetry from your GCP environment and forwards it to the Aurva Control Plane for analysis and visualization.
This guide covers Data Plane deployment on an existing GKE cluster, including infrastructure prerequisites, networking, and the Terraform + Helm deployment workflow.
High Level Architecture
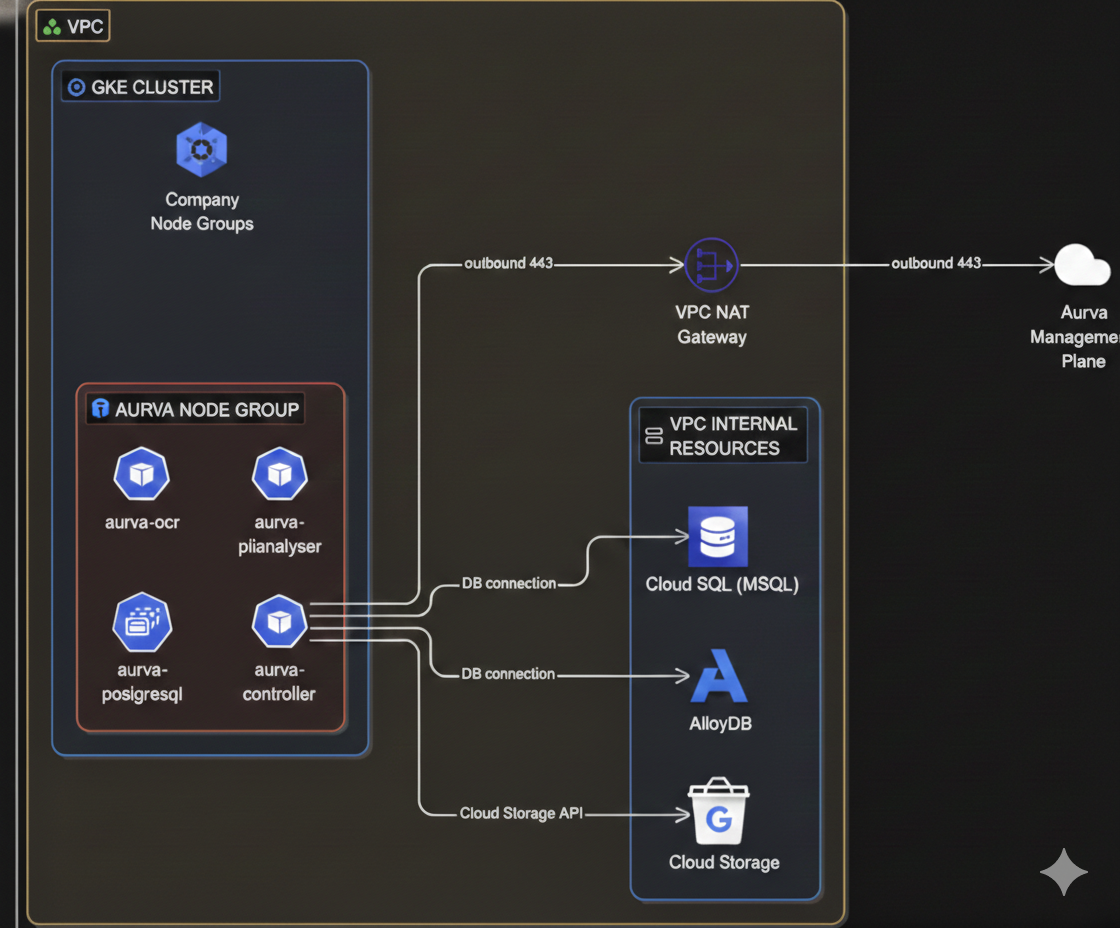
Infrastructure Prerequisites
The customer must provision the following before installing the Data Plane:
Compute
| Component | Requirement |
|---|---|
| Node group | A dedicated node group is recommended (an existing one can be reused) |
| Architecture | x86_64 |
| Node OS | Container-Optimized OS |
| Instance size | n2d-standard-4 (4 vCPU, 8 GB RAM) — minimum |
| Storage | 50 GB minimum |
| Node count | Production: minimum 2; scale out as needed. PoC: 1 is acceptable. |
Storage & IAM
| Resource | Configuration |
|---|---|
| Cloud Storage bucket | Lifetime retention; public access blocked; bucket policy restricts access to the Data Plane service account |
| IAM | Read-only permissions provisioned by the Aurva-supplied Terraform module |
| Terraform backend | GCS bucket for state |
Pod Specifications
Aurva deploys the following workloads into the GKE cluster (production sizing):
| Pod | Type | Replicas | Memory | CPU | Product |
|---|---|---|---|---|---|
controller | Deployment | min 2, max 3 | req 500 MiB / lim 1024 MiB | req 500 m / lim 1000 m | All (DAM, Data Flow, DSPM) |
pii-analyser | Deployment | min 1, max 3 | req 2 GiB / lim 4 GiB | req 1000 m / lim 2000 m | All |
ocr | Deployment | min 1, max 1 | req 1 GiB / lim 1 GiB | req 1000 m / lim 1000 m | DSPM |
postgresql | StatefulSet | 1 | req 200 m / lim 500 m | req 500 MiB / lim 500 MiB | All |
ebpf-agent | DaemonSet | One per node | req 300 MiB / lim 600 MiB | req 300 m / lim 600 m | Data Flow |
Networking Prerequisites
The following outbound connectivity must be permitted from the GKE node VPC:
| Destination | Port | Purpose |
|---|---|---|
Control Plane URL (command.aurva.io for production, command.uat.aurva.io for PoC) | 443 | Data Plane → Control Plane communication |
registry.aurva.io | 443 | Pull Aurva container images |
bifrost.aurva.io | 443 | License validation |
resources.deployment.aurva.io | 443 | Download deployment scripts and resources |
Prerequisites
| Tool | Reference |
|---|---|
| Terraform CLI | developer.hashicorp.com/terraform/install |
| Helm CLI | helm.sh/docs/intro/install |
gcloud configured for the target project | Run gcloud auth login and select the right project |
Deployment Workflow
The deployment is split into two phases: infrastructure (Terraform) and application (Helm).
Infrastructure — Step 1: Download the bundle
mkdir -p /opt/aurva-dataplane
cd /opt/aurva-dataplane
curl -O https://resources.deployment.aurva.io/manifests/main/install-dataplane-gcp-kube.tar.gz
tar -xzvf install-dataplane-gcp-kube.tar.gz
After extraction:
install-dataplane-gcp-kube/
├── infrastructure/
└── helm/
Infrastructure — Step 2: Configure Terraform variables
cd install-dataplane-gcp-kube/infrastructure
vi terraform.tfvars.tpl
Mandatory variables:
| Variable | Description |
|---|---|
project_id | Target GCP project ID |
region | Region hosting the GKE cluster (e.g., asia-south1) |
cluster_name | Name of the target GKE cluster |
network_name | VPC network (and subnet) where the cluster resides |
products | dspm, data_flow, or both |
company_id | Aurva tenant ID — find it in the Aurva console |
dataplane_name | Friendly name for this Data Plane (commonly the cluster name) |
Infrastructure — Step 3: Run the preflight script
This creates or validates the GCS bucket used as the Terraform backend.
chmod +x preflight.sh
./preflight.sh
Infrastructure — Step 4: Plan and apply
terraform plan  -var-file=tfvars/terraform.tfvars
terraform apply -var-file=tfvars/terraform.tfvars
Infrastructure — Step 5: Capture the namespace
export KUBE_NAMESPACE=$(terraform output -raw kubernetes_namespace)
Application — Step 1: Export Helm values
terraform output -raw helm_values_snippet > ../helm/env/production.yaml
Application — Step 2: Set the Kubernetes context
gcloud container clusters get-credentials \
  $(terraform output -raw cluster_name) \
  --region $(terraform output -raw region)
Application — Step 3: Install the Helm chart
cd ../helm
helm upgrade --install aurva-dataplane . \
  -f values.yaml \
  -f env/production.yaml \
  -n $KUBE_NAMESPACE \
  --create-namespace
Verification
kubectl -n $KUBE_NAMESPACE get pods
kubectl -n $KUBE_NAMESPACE logs deployment/controller -f
In the Aurva console, navigate to Settings → Monitoring Configuration. The new Data Plane should appear and be marked Healthy within a few minutes.
Next Steps
- Onboard your first asset via Onboarding a Data Asset Manually.
- Enable DAM via Monitoring Configuration.