Onboarding a Data Asset Manually
Manually onboard a new data asset to Aurva via the Add a Datasource dialog.
Overview
Aurva automatically discovers and inventories data assets across your environment through its auto-inventorization capability. However, there may be cases where you need to manually add a data asset — for example, a newly provisioned database not yet discovered, an on-premises datasource, or a third-party hosted service.
This guide walks you through the process of manually onboarding a new data asset using the Add a Datasource dialog in the Aurva platform.
Prerequisites
-
You have an active Aurva account with Admin or Security Operator role.
-
At least one Controller (data plane) is deployed and online.
-
You have the datasource connection details ready: host, port, and cloud provider information.
-
The datasource is network-reachable from the deployed controller.
Navigation
To access the manual data asset onboarding flow, navigate to:
| DSPM › Data Asset › Asset Settings › Add Manually |
|---|
Step-by-Step Instructions
Step 1: Open the Add a Datasource Dialog
Navigate to DSPM › Data Asset › Asset Settings and click the Add Manually button. The Add a Datasource dialog will appear with three initial fields:
-
Controller — Select the data plane controller that will monitor this datasource.
-
Service Type — Choose the database service type (e.g., AlloyDB, PostgreSQL, MySQL, etc.).
-
Datasource Type — This field auto-populates once a Service Type is selected. Initially shows “No options available” until a service type is chosen.
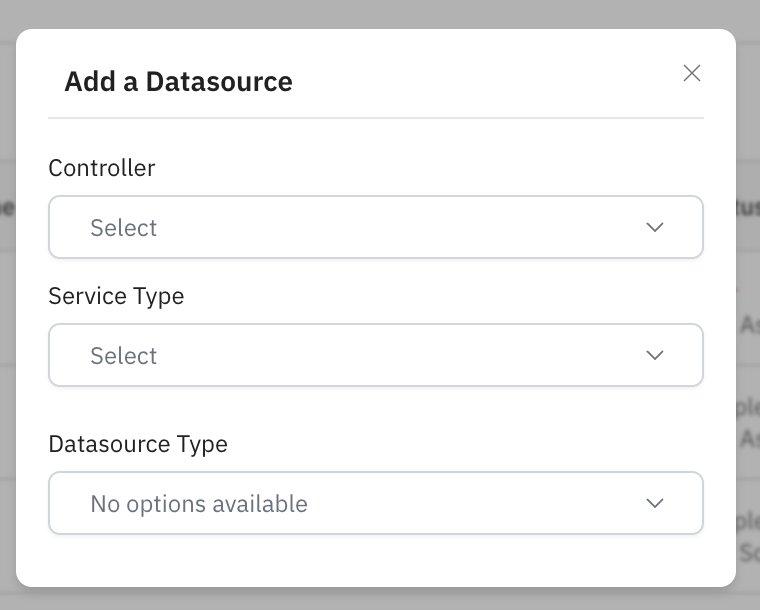
Figure 1: Add a Datasource dialog — initial state
Step 2: Select Controller and Service Type
Select the appropriate Controller from the dropdown. This determines which data plane instance will be responsible for monitoring the datasource.
Next, choose a Service Type. Once selected, the form dynamically expands to reveal additional configuration fields. The Datasource Type field will auto-populate based on your selection.
The expanded form includes the following fields:
| Field | Description |
|---|---|
| Cloud Provider | Select the cloud environment where the datasource is hosted (e.g., AWS, GCP, Azure, Workspace, or Third-party). |
| Datasource Name | A human-readable label to identify this datasource within Aurva. |
| Datasource Host | The hostname or IP address of the datasource. |
| Datasource Port | The port number used to connect to the datasource. |
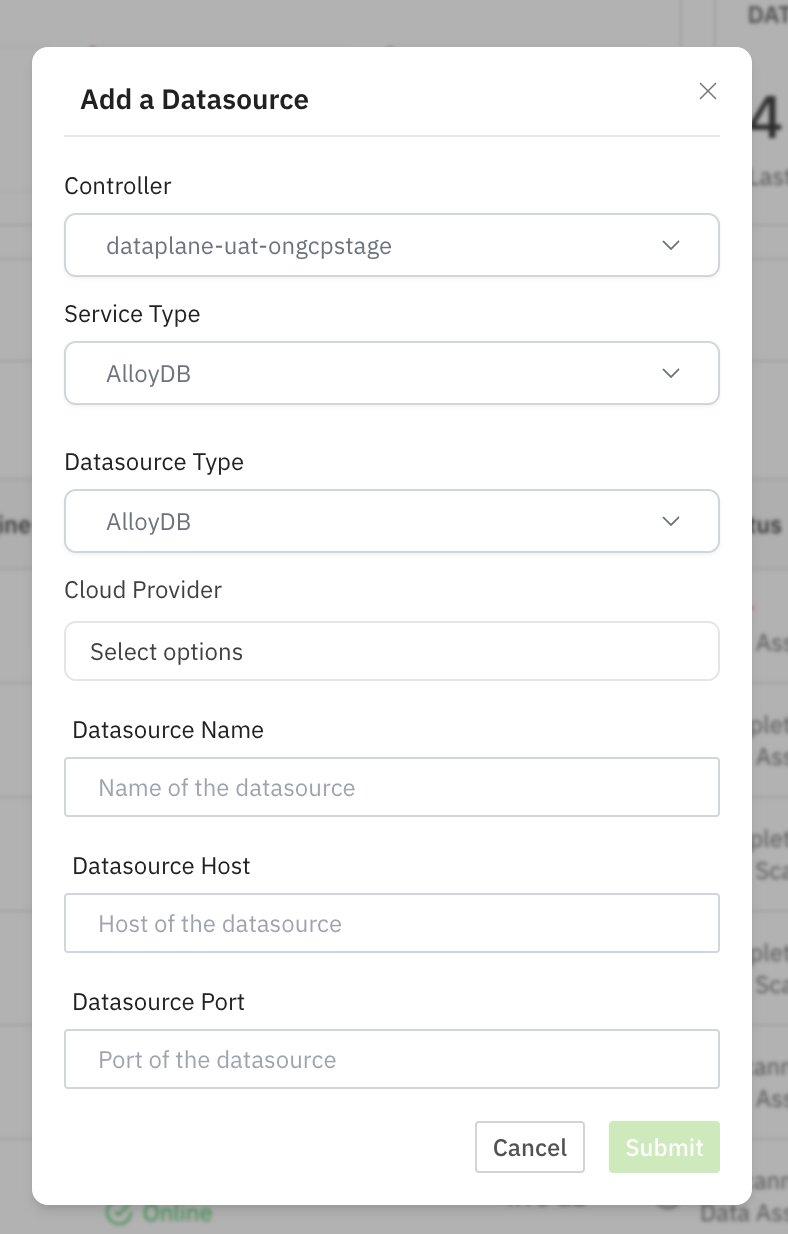
Figure 2: Expanded form after selecting Controller and Service Type
Step 3: Select Cloud Provider
Click the Cloud Provider dropdown to see the available hosting environments. The supported options are:
| Option | Use When |
|---|---|
| AWS | Datasource is hosted on Amazon Web Services (e.g., RDS, Aurora, Redshift). |
| GCP | Datasource is hosted on Google Cloud Platform (e.g., AlloyDB, Cloud SQL, BigQuery). |
| Azure | Datasource is hosted on Microsoft Azure (e.g., Azure SQL, Cosmos DB). |
| Workspace | Datasource is part of an internal or on-premises workspace environment. |
| Third-party | Datasource is hosted on a non-major cloud provider or a managed SaaS platform. |
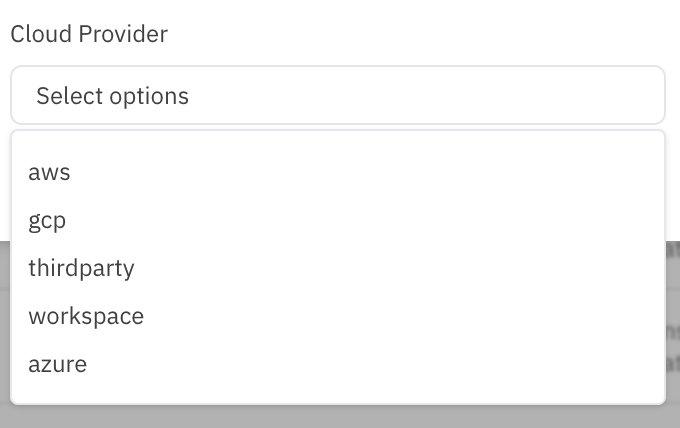
Figure 3: Cloud Provider dropdown options
Step 4: Enter Datasource Details and Submit
Fill in the remaining fields with the datasource connection information:
-
Datasource Name: Enter a descriptive, identifiable name (e.g., “prod-payments-alloydb” or “staging-analytics-pg”).
-
Datasource Host: Enter the fully qualified hostname or IP address of the database server.
-
Datasource Port: Enter the port number (e.g., 5432 for PostgreSQL, 3306 for MySQL, 1433 for SQL Server).
Once all fields are filled, click Submit to add the datasource. Click Cancel to discard and close the dialog.
Tip — After submission, the datasource will appear in your Data Asset inventory. Aurva will begin monitoring the asset based on the policies configured for the selected controller.
Important Notes
-
Dynamic form behavior: The dialog uses progressive disclosure. Additional fields only appear after a Service Type is selected, keeping the initial view clean and focused.
-
Datasource Type auto-populates: You do not need to manually select this field in most cases — it is derived from the Service Type.
-
Controller must be online: Only controllers with an active connection will appear in the Controller dropdown. If you don’t see the expected controller, verify its deployment status.
-
Cloud Provider is multi-select: You can associate a datasource with more than one cloud provider if applicable.
-
This is supplemental to auto-discovery: Aurva’s auto-inventorization will continue to discover assets automatically. Manually added assets appear alongside auto-discovered ones in the unified inventory.