Aurva Database Proxy
Deploy the Aurva Database Proxy for inline query enforcement.
Overview
The Aurva Database Proxy is a secure intermediary that sits between database clients and the database engine itself. It enforces user-defined Guardrail policies — blocking risky queries or masking sensitive results — before they reach the database. By inspecting traffic in the data path, it adds a real-time enforcement layer that complements Aurva's monitoring agents.
This document covers the architecture and infrastructure requirements for deploying the Aurva Database Proxy inside a customer network.
High Level Architecture
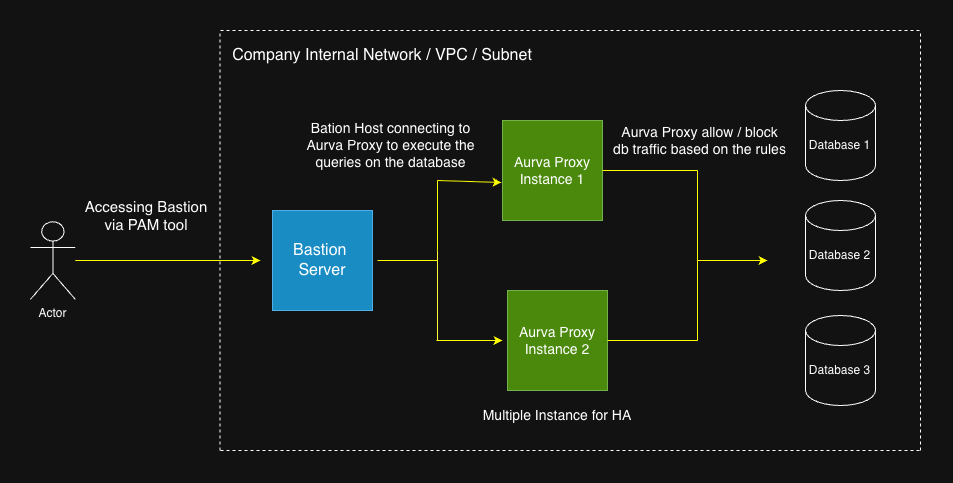
Deployment Modes
Aurva supports two deployment modes for the Database Proxy:
Standard Proxy Mode (Bastion-to-Proxy)
The proxy runs on a dedicated VM and acts as an intermediary between client applications (bastion hosts) and the target database. Clients explicitly connect to the proxy endpoint, which then forwards queries to the database. This mode requires updating client connection strings to point to the proxy.
Inline Proxy Mode (Co-Located)
The proxy runs on the same server as the self-managed database instance. In this mode:
- The database is reconfigured to listen on an internal port (e.g.,
5432→15432for PostgreSQL) - The proxy listens on the database's original port (e.g.,
5432) - Client applications connect to the database on its original port without any configuration changes
| Aspect | Standard Mode | Inline Mode |
|---|---|---|
| Proxy Location | Separate VM | Co-located with database |
| Client Connection | Points to proxy endpoint | Points to original database port |
| Configuration Changes | Required (update connection strings) | Not required |
| Network Complexity | Requires routing/firewall rules | Simpler (same host) |
| Single Point of Failure | No | Yes (shared host) |
| Resource Contention | None | Potential on high query volumes |
| Independent Scalability | Yes | No |
| Database Reconfiguration | Not needed | Required (port change) |
Assumptions
This deployment guide assumes:
- Human users access the target database through a bastion host, either from inside or outside the VPC/VNet. After the proxy is deployed, the bastion host connects to the proxy rather than to the database directly, inserting the enforcement layer in between.
- The Aurva Data Plane controller (the DAM component) is already deployed in the same network. See Data Plane installation guides.
Infrastructure Prerequisites
The customer must provision the following infrastructure before deploying the proxy:
| Component | Requirement |
|---|---|
| Number of nodes | Minimum 2 (for high availability) |
| Architecture | x86_64 or aarch64 |
| Supported OS | Ubuntu 22/24/25, RHEL 8/9/10 |
| Compute | 2 vCPU, 2 GB RAM (minimum) |
| Storage | 30 GB free disk |
Networking Prerequisites
| Source | Destination | Port | Purpose |
|---|---|---|---|
| Aurva Proxy VM | Target databases | Database native ports (e.g. 5432 for PostgreSQL) | Proxy executes queries against the backing database |
| Bastion host | Aurva Proxy | 8085 | Client → proxy connection |
| Aurva Proxy | Aurva Data Plane | 8085 | Relay executed queries to the Control Plane for observability |
Deployment Steps
Step 1 — Download the proxy installer
Run the following commands on the deployment server (or any machine that can reach the proxy nodes):
# Create the install directory
mkdir -p /opt/aurva-dataplane
cd /opt/aurva-dataplane

# Download the bundle
curl -O https://resources.deployment.aurva.io/manifests/main/install-dbproxy-standalone-server.tar.gz

# Extract
tar -xzvf install-dbproxy-standalone-server.tar.gz
Step 2 — Configure environment variables
Open the variables file from the extracted bundle and provide:
| Variable | Description |
|---|---|
CONTROLLER_URL | Aurva Data Plane controller URL with port 8085 |
COMPANY_ID | Your Aurva tenant identifier |
TARGET_DB_HOST | Hostname of the database the proxy fronts |
TARGET_DB_PORT | Port the database listens on |
PROXY_PORT | Port clients should connect to instead of the database |
Step 3 — Run the installer
Execute the bundled main.sh on each proxy node to register it with the Data Plane and start the proxy service.
chmod +x main.sh
sudo bash main.sh
The installer registers the node, downloads the proxy binary, and creates a systemd service named aurva-dbproxy.service.
Step 4 — Update client connection strings
Once the proxy is running, repoint the bastion host (or any client application) to connect to the proxy host and PROXY_PORT instead of the database directly. The proxy presents the same wire protocol as the underlying database, so no client driver changes are required.
Verification
systemctl status aurva-dbproxy.service
journalctl -u aurva-dbproxy.service -f
You should see successful initialization, a heartbeat to the controller, and (after the first client connection) live query logs.
After verification, enable Prevention mode for the corresponding asset under Monitoring Configuration → Enabling Prevention Mode so Guardrail policies authored in Creating a Custom Policy are enforced through the proxy.