Data Plane on Azure VMs
Deploy the Aurva Data Plane on Azure Virtual Machines.
⚠️ Page under revision. The Azure-specific deployment steps are still being authored. The content below was sourced from an AWS-oriented draft and references AWS resources (VPC, AWS Account). For Azure deployment guidance, contact Aurva support.
Overview
Aurva Data Plane is a component responsible for collecting environment-specific data and forwarding it to the Control Plane for visualization. It is ideally deployed in the same VPC as target databases (for DSPM or DAM) within an AWS Account for easier database connectivity and operations.
Currently, 3 types of deployment mechanism are supported for the Data Plane
-
EC2 ASG with all the components deployed in it
-
EKS Deployment with pods running as part of existing Kubernetes cluster
-
ECS Deployment with containers running as part of the existing ECS
This document specifically focuses on deployment using an EC2 Auto Scaling Group (ASG), detailing the required AWS infrastructure, network connectivity, and step-by-step Infrastructure as Code (IaC) deployment instructions using Terraform.
High Level Architecture
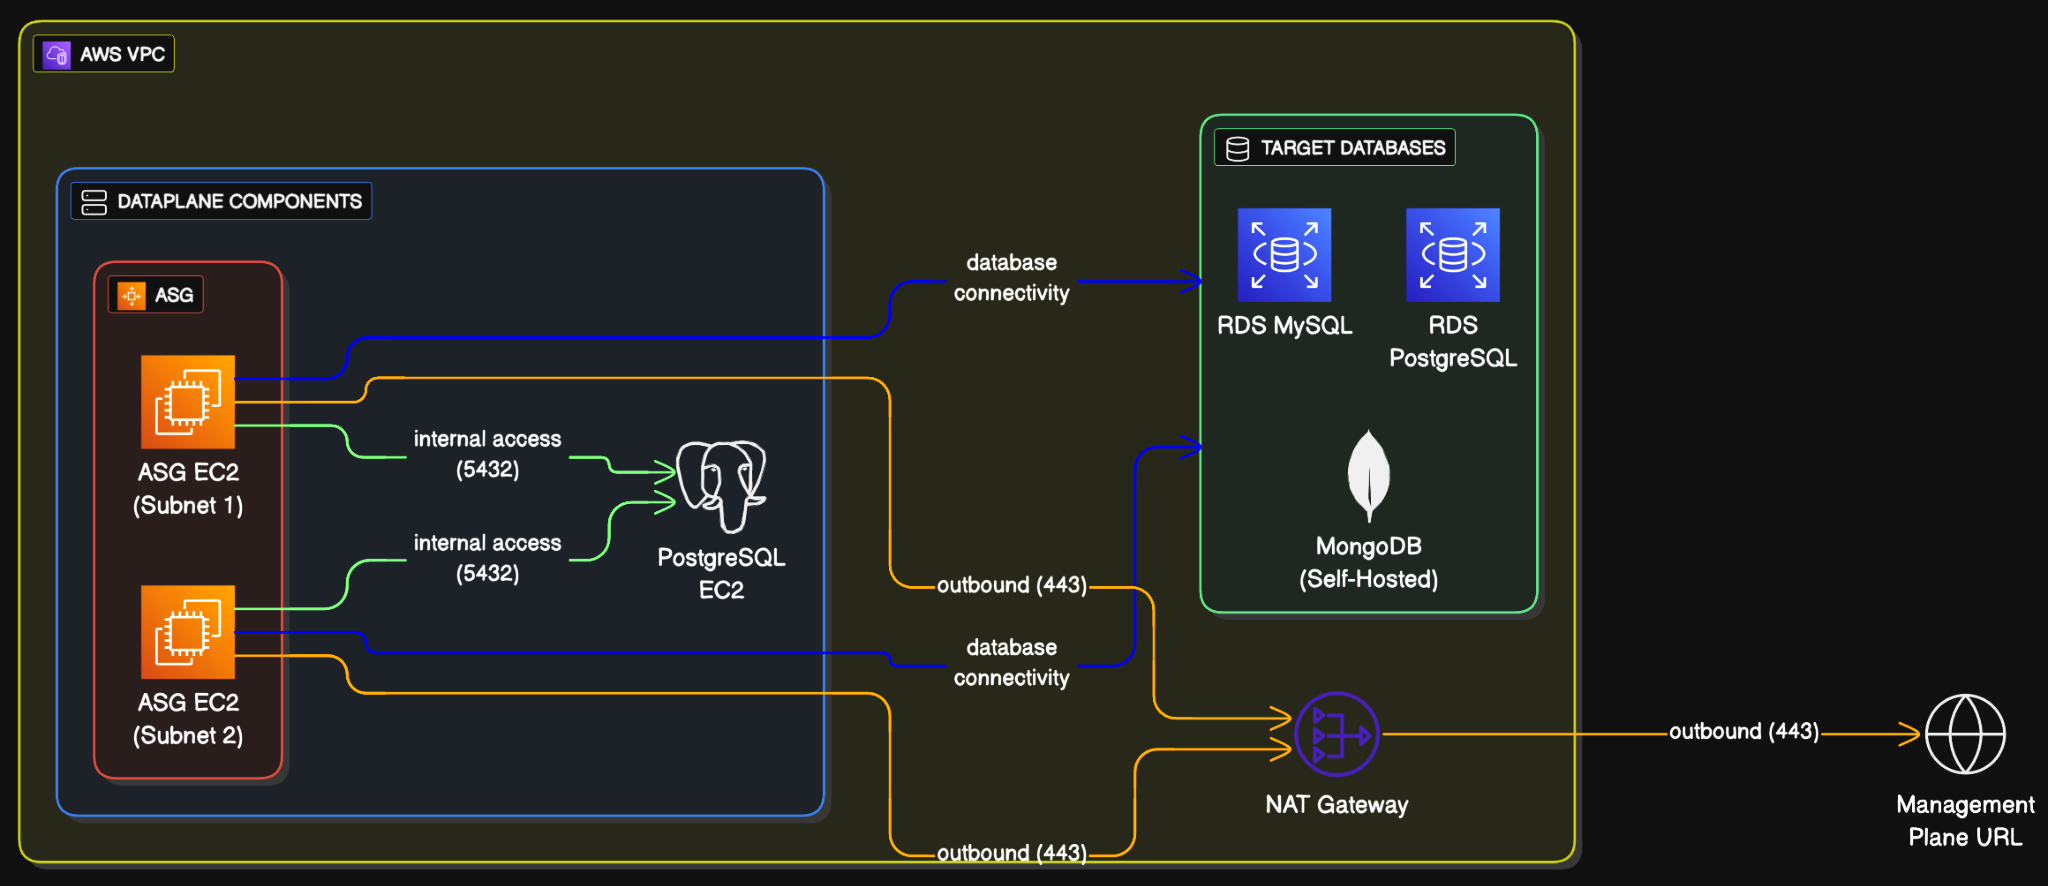
The details of the infrastructure and networking as shown in the architecture diagram is discussed in the following sections.
Infrastructure Components
Please note that the infrastructure described below will be provisioned using Infrastructure as Code (IaC) scripts. It is included here for reference purposes only.
| Component | Specs | ||
|---|---|---|---|
| Auto Scaling Group | Resource | Name | Configuration |
| Auto Scaling Group | aurva-dataplane-asg | Min: 2, Max: 3, Desired: 2 Rolling upgrades | |
| Launch Template | aurva-dataplane-launch-template | Supports: RHEL (8, 9) AMIs | |
| EC2 Instances | aurva-dataplane-instance | 4vCPU, 16GB RAM (c5a.large) | |
| EBS Volume | /dev/xvda | SSD, 64GB | |
| Security Group | aurva-dataplane-sg | Outbound | |
| IP Address | Port | ||
| 0.0.0.0/0 | 443 | ||
| VPC CIDR | 5432 | ||
| No Inbounds | |||
| PostgreSQL EC2 Instance | Resource | Name | Configuration |
| EC2 Instance | aurva-postgresql-instance | 2vCPU, 2 GB RAM (t3g.small) | |
| EBS Volume | /dev/xvda | gp3, 30GB | |
| PostgreSQL Secret | aurva-postgresql-values | 30 days recovery | |
| Security Group | aurva-postgresql-sg | Outbound | |
| IP Address | Port | ||
| 0.0.0.0/0 | 443 | ||
| Inbound | |||
| IP Address | Port | ||
| VPC CIDR | 5432 | ||
| Key Vault | aurva-postgresql-values 30 days recovery period Auto-Generated Password | ||
| IAM Permissions | Aurva Managed DSPM Read only IAM permissions are required. List can be found here. | ||
| Aurva Managed DAM IAM Permissions. List can be found here. | |||
| SSM Permission (AmazonSSMManagedInstanceCore) to access the instance using SSM | |||
| S3 Bucket (optional, for DAM only) | Retention: 3 days | ||
| Encryption: Server Side Encryption (SSE-3) | |||
| Publically Accessible: Blocked | |||
| Bucket Policy: Access restricted to data plane IAM role only | |||
| Terraform Backend resources | S3 Bucket: aurva-terraform-state-{ACCOUNT_ID} | ||
| DynamoDB Table: aurva-terraform-locks | |||
| State file: Encrypted, versioned |
Networking Overview This section applies only to environments where a proxy or firewall controls outbound traffic. In such cases, the listed subdomains must be explicitly whitelisted to allow outbound connectivity.
The following outbound subdomains must be reachable from the Data Plane ASG VPC.
| Subdomain | Port | Purpose |
|---|---|---|
| Control Plane URL: command.aurva.io (for production) command.uat.aurva.io (for PoC) For PaaS, It is going to be the company’s internal subdomain. Ask your DevOps team to provide the details. | 443 | Control Plane URL to connect Data Plane to Control Plane |
| Aurva’s deployment resources resources.deployment.aurva.io | 443 | To download deployment scripts and associated resources |
| Aurva’s private registry registry.aurva.io | 443 | To download application images |
AWS APIs: sts.<region>. amazonaws.com s3.<region>. amazonaws.com rds.<region>. amazonaws.com dynamodb.<region>. amazonaws.com iam.<region>. amazonaws.com cloudwatch.<region>.amazonaws.com | 443 | AWS APIs needed to identify the resources and carry out the business logic for DAM and DSPM. For strict egress environments, follow the AWS documentation to add these as private endpoints in order to access them privately. Please note that private endpoints will not be added automatically by Aurva terraform script. The customer needs to add them manually . |
Deployment Steps Aurva provides IaC (Infrastructure as Code) to deploy the above-mentioned components.
It is the easiest and recommended way to deploy Aurva and test out its capabilities.
Following tools needs to be present in the local computer in order to deploy:
| Tool | Testing Procedure |
|---|---|
| Terraform | Once downloaded, can be verified by running the following command: terraform version |
| AWS CLI | Once downloaded, can be verified by running the following command: AWS --version |
| AWS Credentials | AWS Credentials for the AWS Account should be configured on the terminal before proceeding ahead. If not configured, use the following command and fill the SECRET keys AWS configure --profile=PROFILE_NAME Export the profile # for linux export AWS_PROFILE=PROFILE_NAME # for windows powershell $Env:AWS_PFOFILE=PROFILE_NAME Run the following command to verify: AWS sts get-caller-identity |
Once the above prerequisites are checked, we can use the following steps:
Step 1: Downloading the terraform script
Download the desired terraform script. Run the following command in sequence.
# create a directory to store the terraform script on local machine
mkdir -p /opt/aurva-deployment && cd /opt/aurva-deployment
run the curl command to download the tar file for the script
curl -O https://resources.deployment.aurva.io/manifests/main/install-dataplane-AWS-vm.tar.gz
extract the script from the tar
tar -xzvf install-dataplane-AWS-vm.tar.gz
remove the tar file
rm install-dataplane-AWS-vm.tar.gz
navigate to the directory
cd /opt/aurva-deployment/install-dataplane-AWS-vm
Step 2: Configuring the environment variables Copy the file contents of terraform.tfvars.tpl to terraform.tfvars
cp terraform.tfvars.tpl terraform.tfvars
Open terraform.tfvars file to make the changes
vi terraform.tfvars
The variable file is self-explanatory to make the changes. Once changes are made, save the file and exit.
Step 3: Initialize the terraform backend (S3 bucket and a Dynamo DB table)
Linux or MacOS (bash script)
# make the pre-flight script executable
chmod +x preflight.sh
execute the pre-flight script
this will initialise the terraform backend
bash preflight.sh
Windows (Powershell)
# execute the pre-flight script
This will initialise the terraform backend
./preflight.ps1
Step 4: Execute the terraform script
# initialize the terraform
terraform init
plan the infrastructure.
this will tell all the compoents we will be creating.
verify it before moving ahead
terraform plan
execute the terraform
terraform apply
The deployment execution will take close to 5-10 minutes.
Deployment Verification
Once the deployment is completed, we can verify the deployment in the following 3 basic steps:
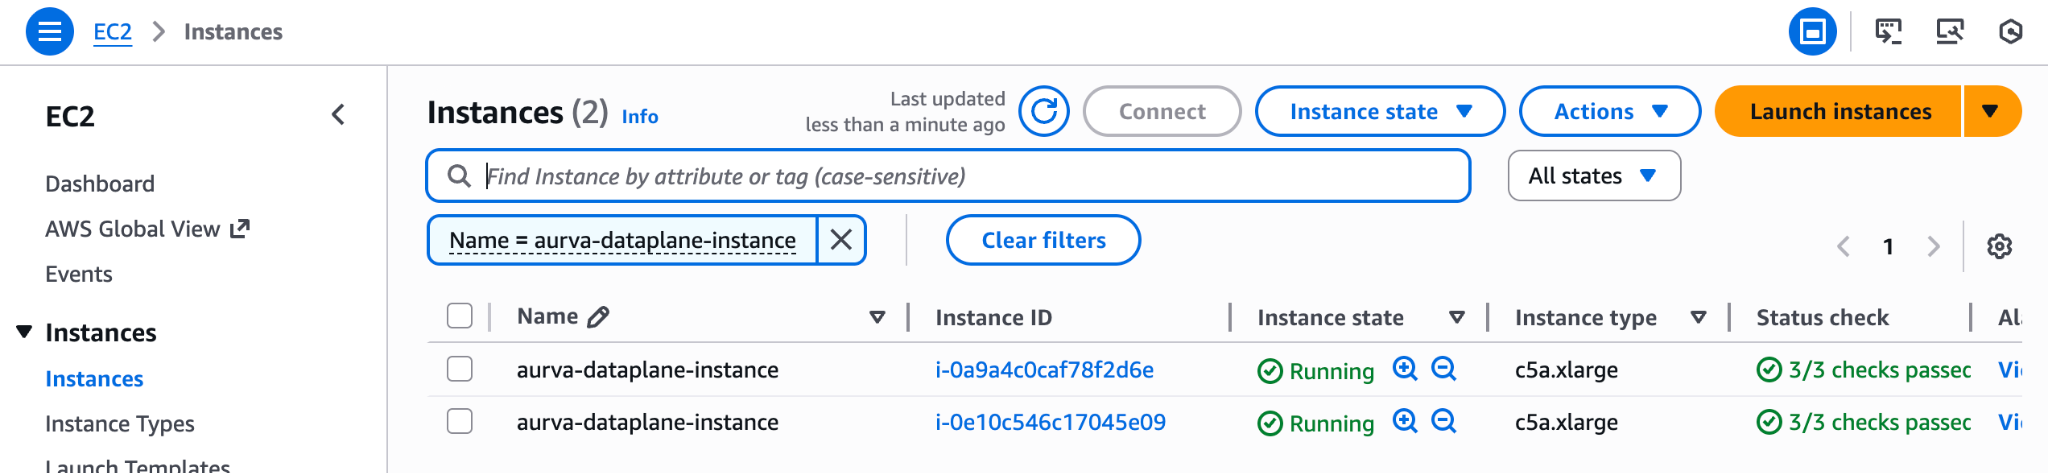
Step 1: Get Instance ID of any one of data plane instance
If the instance comes to the running state, find out the Instance ID of the data plane instance by visiting the EC2 page.
Step 2: SSH into the instance
SSH either by using AWS SSM CLI, website or SSH into the machine
for SSM using CLI, run the following command from your local machine (NOTE: requires AWS credentials to be configured with permission to start ssm session)
# start the session
AWS ssm start-session --target <INSTANCE_ID>
get sudo access
sudo su
check if docker containers are up and running (usually takes 3-5 minutes after instance start)
docker ps
logs container ids and the name of the container
check logs of one of the services
docker logs <CONTAINER_ID>
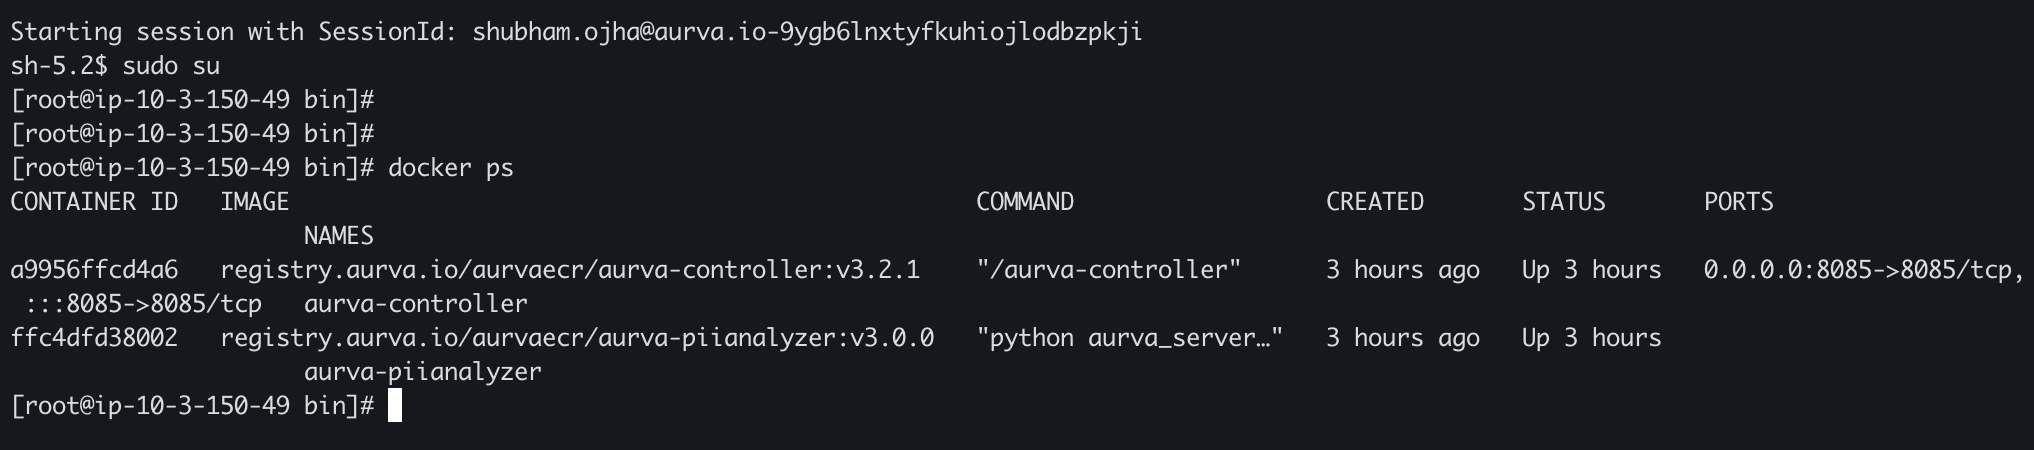
If you are able to see the containers, it means that the container images are pulled and invoked.
Step 3: Check Aurva dashboard System Health page
System Health page should show Aurva Controller (identified as data plane name filled in the terraform variable file) is in Online state.
