eBPF DAM on Linux Servers
Enable DAM on self-hosted Linux databases using the Aurva eBPF agent.
Overview
Aurva uses an eBPF agent to enable Database Activity Monitoring on self-hosted databases running on Linux. Currently supported engines include PostgreSQL, MySQL, MongoDB, and MSSQL.
This solution does not require database audit logs to be enabled and is lightweight: typical CPU and memory overhead is under 8% of the host system.
The agent observes network activity inside the database server and extracts every query executed against the engine.
This document focuses on deploying the eBPF agent on on-premises database servers.
High Level Architecture
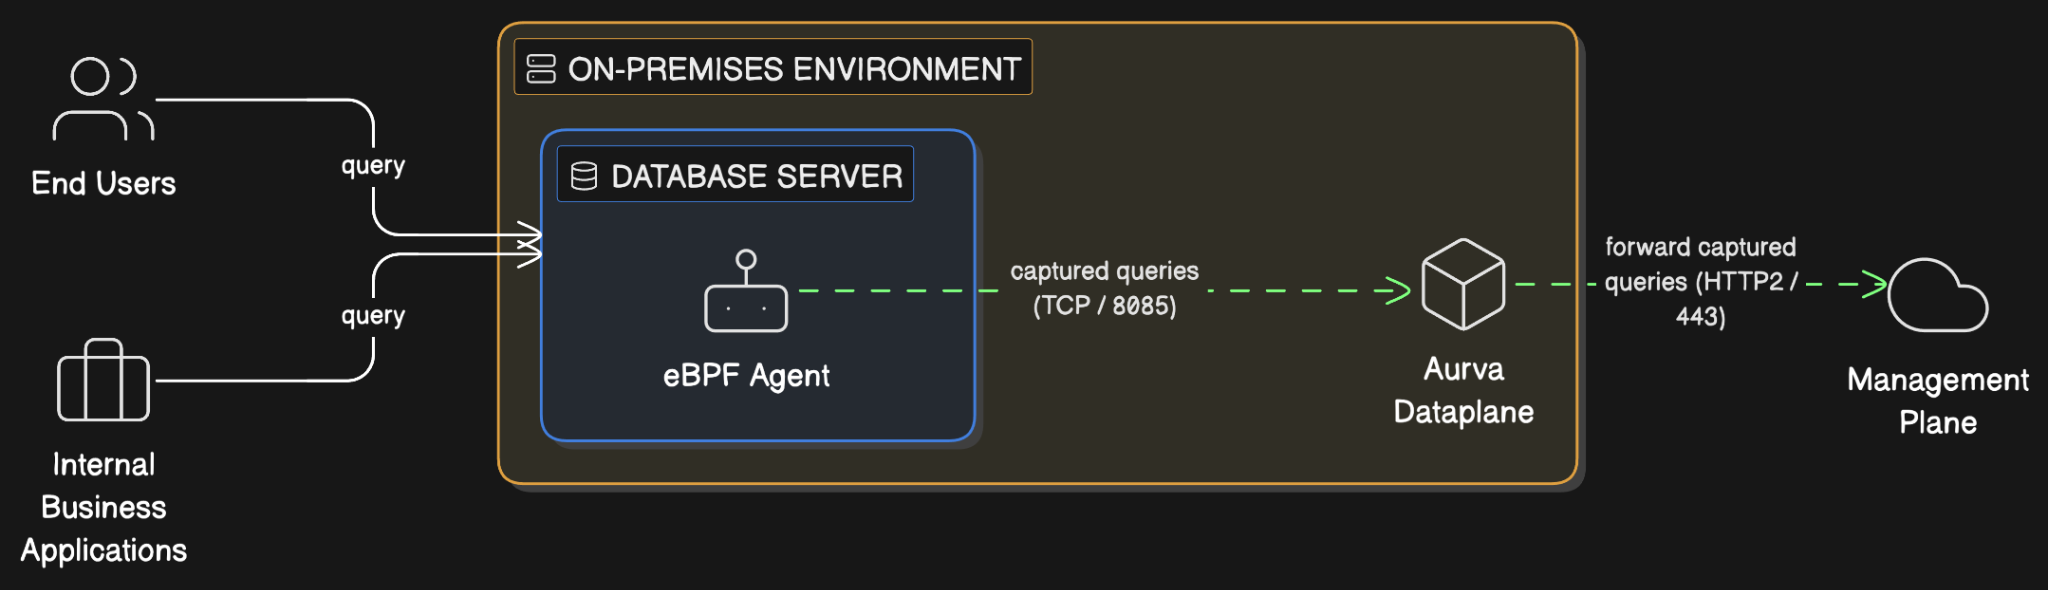
Aurva deploys an eBPF agent directly on the database host. The agent captures queries originating from business applications, end users, or anywhere on the host's network namespace, and relays them to the Aurva Data Plane.
eBPF (extended Berkeley Packet Filter) is an open-source mechanism that runs sandboxed programs in the Linux kernel. The agent uses it to observe inbound network packets to the database without modifying the database itself.
Prerequisite: the Aurva Data Plane must already be deployed in your environment. See the Data Plane installation guides for the appropriate deployment option.
Infrastructure Prerequisites
| Component | Support | Notes |
|---|---|---|
| Database host OS | Linux | Most modern Linux distributions are supported |
| Kernel version | ≥ 5.10 (Debian/Ubuntu), ≥ 4.10 (RHEL/Oracle Linux) | Run uname -r to check |
| Database engine | PostgreSQL 11–17, MySQL 5/8, MongoDB 6/7/8 | Additional engines available on request |
| Aurva Data Plane | Required | Must be reachable from the database host |
Networking Prerequisites
The following outbound connectivity must be permitted from the database host to the Aurva Data Plane:
| Destination | Port | Purpose |
|---|---|---|
| Data Plane server (or load balancer IP) | 8085, 7085 | Agent → Controller telemetry |
Deployment Steps
Aurva provides an installation script that handles binary download, configuration, and service registration. Follow the steps below in order.
Step 1 / 7 — Become root
sudo su
Step 2 / 7 — Create the install directory
mkdir -p /opt/aurva-dataplane
cd /opt/aurva-dataplane
Step 3 / 7 — Download the installer
If your database host has direct internet access, fetch the bundle straight from the Aurva resource manager:
curl -O https://resources.deployment.aurva.io/manifests/main/install-standalone-ebpf-binary-linux.tar.gz
tar -xzvf install-standalone-ebpf-binary-linux.tar.gz
If the host has no direct internet access but can reach the Data Plane controller, route the download through the controller's relay endpoint. Replace CONTROLLER_ADDRESS with your Data Plane host and substitute the credentials provided by Aurva support:
curl -X POST http://CONTROLLER_ADDRESS/download \
  -H "Content-Type: application/json" \
  -d '{
    "destination": {
      "baseURL": "https://resources.deployment.aurva.io",
      "filePath": "/manifests/main/install-standalone-ebpf-binary-linux.tar.gz"
    },
    "auth": {
      "type": "basic",
      "clientId": "<request from Aurva support>",
      "clientSecret": "<request from Aurva support>"
    },
    "httpMethod": "GET"
  }' \
  -o install-standalone-ebpf-binary-linux.tar.gz

tar -xzvf install-standalone-ebpf-binary-linux.tar.gz
rm install-standalone-ebpf-binary-linux.tar.gz
Step 4 / 7 — Navigate to the script directory
cd /opt/aurva-dataplane/install-standalone-ebpf-binary-linux
Step 5 / 7 — Configure environment variables
Open the variables file in your editor of choice:
vi /opt/aurva-dataplane/install-standalone-ebpf-binary-linux/variables/env
Set the following values:
| Variable | Description |
|---|---|
COMPANY_ID | Your Aurva tenant identifier (provided by Aurva support) |
CONTROLLER_URL | Data Plane URL with :8085 port appended |
COLLECTOR_VERSION | Collector image tag (provided by Aurva support) |
Then enable the trace flags for the database engines you want to monitor:
For MySQL or MariaDB:
TRACE_MYSQL=true
TRACE_SSL=true
For PostgreSQL:
TRACE_PSQL=true
TRACE_SSL=true
For MongoDB:
TRACE_MONGO=true
TRACE_SSL=true
Step 6 / 7 — Make the installer executable
chmod +x /opt/aurva-dataplane/install-standalone-ebpf-binary-linux/main.sh
Step 7 / 7 — Run the installer
bash /opt/aurva-dataplane/install-standalone-ebpf-binary-linux/main.sh
Installation typically completes in 1–2 minutes.
Deployment Verification
After installation completes, confirm the agent is running:
1. Tail the systemd journal:
journalctl -u aurva-collector.service -f
2. Check the service status:
systemctl status aurva-collector.service
You should see the service in the active (running) state and recent log lines indicating successful query capture.
Next Steps
- Add the database asset to monitoring via the Monitoring Configuration page so the captured queries appear in the Aurva console.
- For troubleshooting, see Troubleshooting → DAM Agents.